
So you want to make a VR game. Let’s jump in and get our first objects moving! This tutorial will show you how to program objects in Unity using C#.
Tweet
We’re about to build a Whackamole game where we will code targets to move, hiding underneath a table.
In this tutorial:
- Step 1: Setting Up Variables
- Step 2: Setting Up The Target Position
- Step 3: Making Smooth Movement
- Step 4: Changing Movement Speed
- Step 5: Setting Up A Method
- Step 6: Connecting The Player Script
- Step 7: Setting The Beginning Of The Game
- Conclusion
To follow along, you’re going to need a Unity project open that has at least one object that we can write scripts for. If you need help setting up your Unity project, go to our post How to Build a Unity Virtual Reality Game.
We’re using Unity v5.4.3f1. If you’re using a different version of Unity and find an incompatibility, drop us a comment down below with your question. Also, we know this tutorial is long, so feel free to use the comments to bookmark your spot!
Step 1: Setting Up Variables
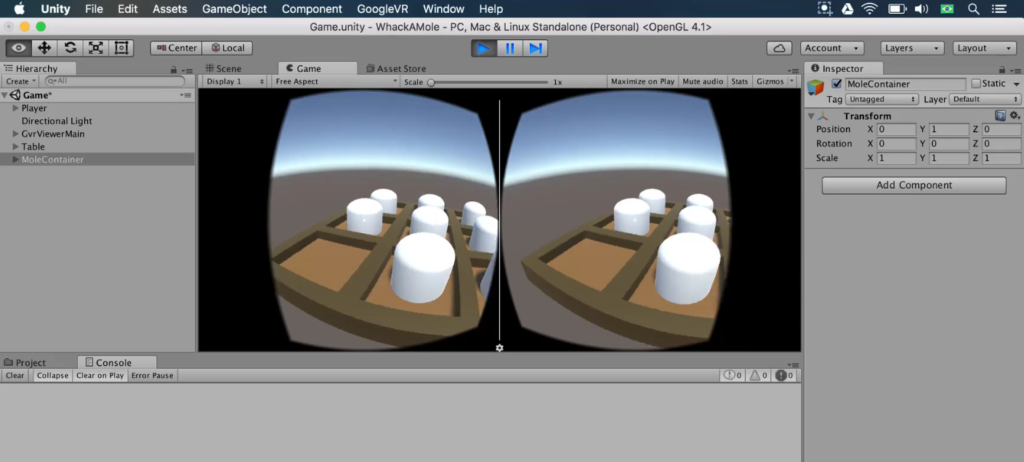
In our example, we have set up a table with 9 objects representing moles. We’re going to get these objects moving up and down, hiding and appearing under the table. This is a great template for a Whackamole game, where moles frequently pop up and down, or any game where you want to have surprise enemies or collectables appear.
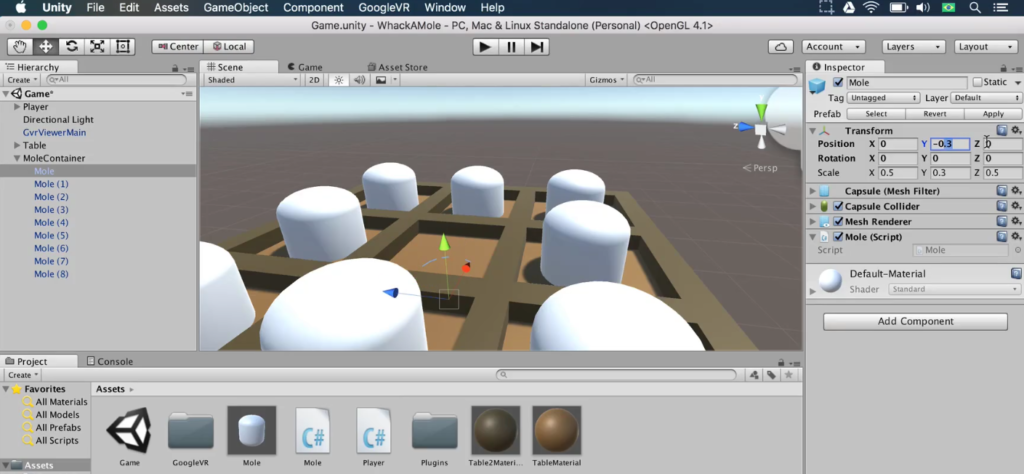
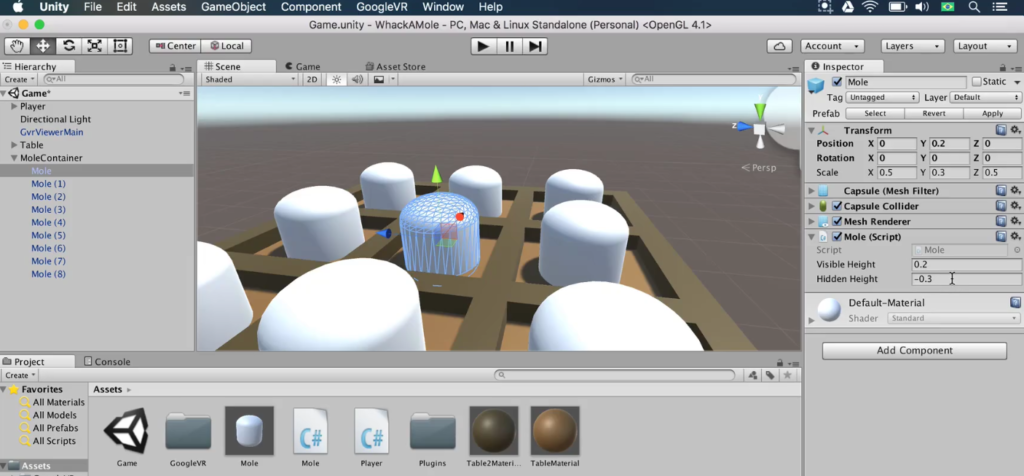
We will have the moles hide under the table when they are hit. The moles currently have a Y position of 0.2. When a mole’s Y position is -0.3, the mole is hidden under the table, as shown in the previous image.
Open the Mole script, which is the main script connected to the objects you want to move. Use the following code to declare two variables. These variables assign the visible and hidden heights of the moles to 0.2 and -0.3, respectively.
public class Mole : MonoBehaviour {
public float visibleHeight = 0.2f;public float hiddenHeight = -0.3f;
// Use this for initialization void Start () { } // Update is called once per frame void Update() { }
}
Note that the variables are of type float. That means this type of variable must be a number, and it can have decimal places.
Let’s see how this code affected our game. Save the script, and open Unity. The Mole (Script) component of every mole will contain two new fields: Visible Height and Hidden Height.
Step 2: Setting Up The Target Position
Now we can use code to start changing the objects’ positions. Let’s open Mole.cs. To hide the moles, declare the following variable to represent the moles’ positions.
public float visibleHeight = 0.2f;
public float hiddenHeight = -0.3f;
private Vector3 targetPosition;
In the Start method, use the following code to set targetPosition to a new Vector3 at the beginning of the game.
// Use this for initialization void Start () { targetPosition = new Vector3 (); }
We want to set the moles’ target position to be the state where the moles are hidden. We will keep the X and Z positions but force the Y position to change. We will make a new Vector3, and we need to pass X, Y, and Z as the parameters for the constructor because we are constructing a new Vector3.
Use the following code to keep the X and Z positions relative to the Mole container. The Y position will be hiddenHeight.
// Use this for initialization void Start () { targetPosition = new Vector3 (
transform.localPosition.x,
hiddenHeight,
transform.localPosition.z
);}
targetPosition will track where the moles need to be.
Step 3: Making Smooth Movement
We want the mole to slowly move to targetPosition. So, in the Update method, call the Lerp method to make a smooth transition from one position to another.
// Update is called once per frame void
Update () {
transform.localPosition = Vector3.Lerp();
}
The Lerp method requires three parameters:
- The first parameter is the moles’ current position, also known as the local position.
- The second parameter is the moles’ target position (the destination where you want it to go.)
- The third parameter is the Time component (how long it takes the object to move from the local position to the target position.)
// Update is called once per frame void
Update () {
transform.localPosition = Vector3.Lerp(transform.localPosition, targetPosition, Time.deltaTime); }
Time.deltaTime
Time.deltaTime ensures that the game’s experience will be as similar as possible regardless of the device each player is using, regardless of that device’s processing rate.
How does Time.deltaTime do this? Well…
Time.deltaTime will return the number of seconds that have passed since the last frame. With a fast processor, Time.deltaTime will be a smaller number than with a slower processor. A fast processor would move a shorter distance each time the Update method is called. A slow device would move longer distances each time. Thus both will have the similar rates.
Let’s test if our movement is smooth! Save the script, and open Unity. Press Play. You should see the moles will move under the table. That means success!
Step 4: Changing Movement Speed
Next we change change the objects’ movement speed. Let’s increase the speed at which the moles hide.
To get started, stop playing the scene. Open Mole.cs. Declare the following speed variable.
public float visibleHeight = 0.2f;
public float hiddenHeight = -0.3f;
public float speed = 4f;
In the Update method, multiply Time.deltaTime by speed, to affect the time it takes the object to move from its current position to the target position.
// Update is called once per frame void
Update () {
transform.localPosition = Vector3.Lerp(transform.localPosition, targetPosition, Time.deltaTime); }
Let’s test how this affects our game. Save the script, and open Unity. Press Play. The moles will lower so quickly that you will not even see them in the scene.
For testing purposes, we will have the moles be visible at the start of the game. To implement this, in the Start method, replace hiddenHeight with visibleHeight.
// Use this for initialization void Start () { targetPosition = new Vector3 (
transform.localPosition.x,
visibleHeight,transform.localPosition.z
);}
Remember that the Start method is called once as soon as the game starts, so this will affect the height at the beginning of the game.
Step 5: Setting Up A Method
The next logic we need is that when Player looks at a mole and hits space, the mole will hide. To implement this, we’ll use a new method. Below the Update method in the Mole class, create a method called OnHit using the following code.
public void OnHit () { }
If the mole is hit, this method will make it move down. To do so, copy and paste the code in the Start method into OnHit. But replace visibleHeight with hiddenHeight.
public void OnHit () { targetPosition = new Vector3 ( transform.localPosition.x, hiddenHeight, transform.localPosition.z ); }
As such, OnHit will change targetPosition. The Update method will ensure that the mole changes position.
But we’re not done yet! We need to connect the OnHit method with the player doing the hitting.
Step 6: Connecting The Player Script
Save the script, and open Player.cs. We need to call the OnHit method when Player hits a mole. Replace the Debug line in the Update method with the following code, which stores a reference of the mole.
In the Update method, locate where the raycast triggers when the player touches the target object (If you don’t have this, check out our previous tutorial.) Add the following bold line of code.
This new line creates a variable named mole of type Mole. It sets the variable’s value to be the Mole component of the object hit.
// Update is called once per frame
void Update () {
if (GvrViewer.Instance.Triggered || Input.GetKeyDown("space")) {
RaycastHit hit;
if (Physics.Raycast(transform.position, transform.forward, out hit)) {
if (hit.transform.GetComponent () != null) {
Mole mole = hit.transform.GetComponent ();
}
}
}
}
Call OnHit on the mole variable.
if (hit.transform.GetComponent () != null) {
Mole mole = hit.transform.GetComponent ();
mole.OnHit (); }
Save the script, and open Unity. Press Play. When you look at a mole and hit Space, the mole will move down. That means our code is working.
Step 7: Setting The Beginning Of The Game
We no longer need to see the moles visible at the beginning of the game. So, stop playing the scene. Open Main.cs. In the Start method, replace visibleHeight with hiddenHeight.
// Use this for initialization void Start () { targetPosition = new Vector3 (
transform.localPosition.x,
hiddenHeight,
transform.localPosition.z
);}
To ensure that the moles do not animate at the beginning of the game, use the following code to force the position to go straight to targetPosition.
// Use this for initialization void Start () { targetPosition = new Vector3 (
transform.localPosition.x,
hiddenHeight,
transform.localPosition.z
);
transform.localPosition = targetPosition;}
Save the script.
Conclusion
That does it for this article! Let’s summarize what we’ve done so far:
- Set up Vector3 variables
- Set an object’s local and target position
- Used Time.deltaTime to equalize the game experience across devices
- Set up our own method
- Connected a method in an object script to the Player script
- Moved objects based on user input
Review
- Step 1: Setting Up Variables
- Step 2: Setting Up The Target Position
- Step 3: Making Smooth Movement
- Step 4: Changing Movement Speed
- Step 5: Setting Up A Method
- Step 6: Connecting The Player Script
- Step 7: Setting The Beginning Of The Game
- Conclusion
—Team Mammoth from Mammoth Interactive INC. Tutorial by Glauco Pires and Transcribing by Alexandra Kropova