Do you want to build your first game? Everyone who wants to be a game developer needs to know at least some coding. In this free tutorial, learn how to create your first C# script in Unity…
Tweet
In this tutorial:
Part 1: How to Organize Scripts in Unity
Part 2: How to Make a New Script in Unity
Part 3: How to Use MonoDevelop with Unity
Part 4: Understanding a C# Script
Part 5: Debugging and Testing
Setup
To follow along with this tutorial, you’ll need to open a new Unity project.
We’re using Unity v5.4.3f1. If you’re using a different version of Unity and find an incompatibility, drop us a comment down below with your question.
Part 1: How to Organize Scripts in Unity
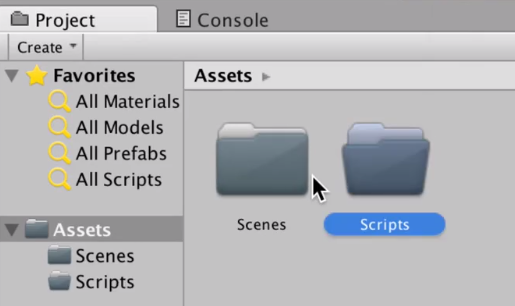
First, let’s organize our folders in the Project window. To keep our game organized (which you will be thankful for as your game grows bigger and more complex) we will make a new folder to contain our scripts.
In the Project window, open the Assets folder, and right-click inside the folder. From the menu that appears from your mouse, select Create > Folder. This will make a new folder.
Name the folder “Scripts.” This folder will keep our Scripts organized separately from our Scenes.
Part 2: How to Make a New Script in Unity
Double-click on the Scripts folder to open it. Right-click, and select Create > C# Script. The script is of type C# because that is the programming language in which we will code the script.
Name the script “GameController”. This will be the script that controls our game.
Hit Enter to create the script.
What Is the Spinning Wheel in Unity
After you hit Enter, a spinning wheel will appear in the bottom right corner of Unity as in the next image. This occurs every time you create a new script because the code needs to compile. By compiling code, Unity turns the code into a format that it can understand.

When Unity finishes compiling, the spinning wheel will disappear.
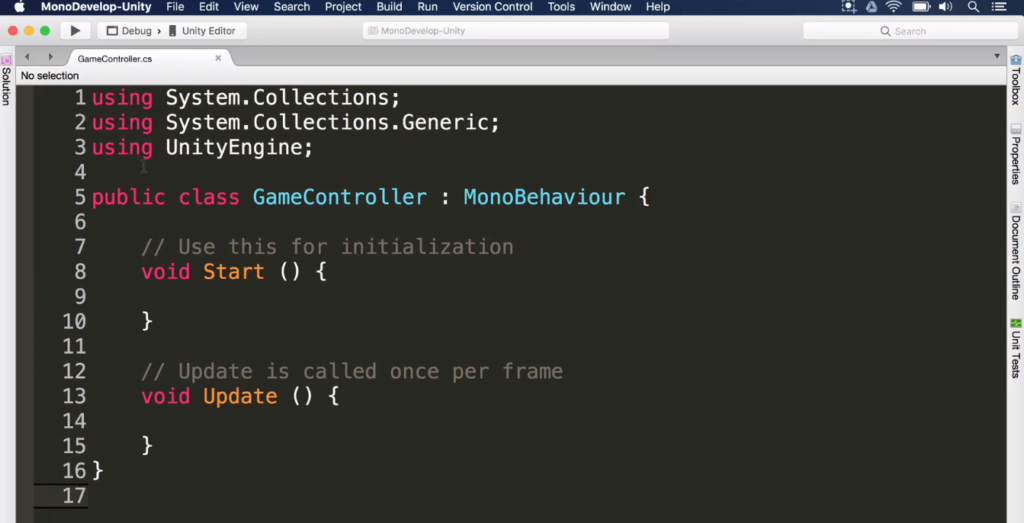
Double-click on GameController to open it in your code editor of choice. Our tutorial will use MonoDevelop, but you can follow along with another code editor such as Visual Studio.
Part 3: How to Use MonoDevelop with Unity
Depending on your version of Unity, you may not have MonoDevelop as the default editor bundled with Unity. You’ll have to select it as the script editor in Unity.
MonoDevelop is free and open-source. When you double click on GameController.cs, the script we created, its file will open in MonoDevelop.
Part 4: Understanding a C# Script
As you can see, a default C# script contains some code automatically created. The top of this script contains 3 lines, each beginning with the keyword using.
using System.Collections;
using System.Collections.Generic;
using UnityEngine;

Namespaces
These 3 lines import namespaces. You can think of System.Collections, for example, as a folder that contains definitions of things that can be used in our game.
Once we include the folder with the keyword using, we can use the items that are available in the folder. That means we don’t have to make our own items from scratch. This makes building games and writing code faster.
Class Definition
The code below those 3 lines is the class definition. This code defines the class GameController.
public class GameController : MonoBehaviour { // Use this for initialization void Start () { } // Update is called once per frame void Update () { }
}
A class is a collection of elements of code that change how the script behaves. We will make GameController, an initially abstract object that behaves in a certain way that we will define inside the class with code.
: MonoBehaviour in the class definition means that GameController extends MonoBehaviour. Put another way, GameController is something that changes how the game object we use behaves.
C# Methods
The GameController class contains 2 default methods: Start and Update. A method contains instructions that are run when you call the method.
An analogy for methods is changing the channel on TV. When changing the channel, you give your TV the instruction that you want to change the channel. The method for this instruction could be ChangeChannel().
Method calls can receive parameters. The parameter for the ChangeChannel method would be the channel you want to watch. In our code, the parameters for a method go in parentheses after the method’s name.
The Start() and Update() Methods
The Start method is automatically called whenever the script is ready to be used and loaded. The Update method is called every frame. When you play a game on your computer, for example, the game runs at a certain speed measured in frames per second.
Frames per second refers to the number of frames or pictures you see per second. As the frames change, your brain sees them as an illusion that there is movement on the screen. If your game runs at 60 frames per second, the Update method will be called 60 times per second. The Update method is useful for many parts of game development, including checking conditions and making timers.
A line that starts with // precedes both the Start and Update methods. Writing a line that begins with // turns the line into a comment, which is not read by the compiler. You can write comments to organize your code or leave reminders.
Part 5: Debugging and Testing
To test if the game is working, we will print a simple message in the Console. Type Debug.Log in the Start method, as has been done in the following code.
// Use this for initialization Start () { Debug.Log; }

Debugging
Debug is a class that contains methods to debug your game. When we use a dot, we access something inside the Debug class. Using the keyword Log allows us to access the Log method.
Parameters
To show how debugging works, let’s print the message “Hello world!”. The message text will be the parameter of the Log method. A parameter gives extra information for a method to work properly. As you can image, we can’t log a message without setting the text of the message itself!
To set the parameter of the Log method, type “Hello world!” in parentheses after Debug.Log (separated by a space).
C# Syntax
Syntax refers to a specific programming langauge’s requirements in terms of formatting your code in order for the code to run properly in that language.
To abide by proper C# syntax, you must enclose the message in parentheses to show that it is a parameter of the Log method. This is C# convention. As well, because we are working in C#, you must end the line with a semi-colon.
// Use this for initialization Start () { Debug.Log("Hello World!"); }
Note that you must enclose the message in quotation marks because it is a string. A string is a type of variable that is made up of a collection of characters. A variable is a piece of memory that stores some data.
Printing Messages in the Console
Next, let’s test if the message prints in the Console!
Save the GameController.cs file by hitting Command+S on a Mac or Control+S on a PC. Open Unity.
Note that, before running your game, you must wait for Unity to finish compiling your script. When the spinning wheel in the bottom right corner disappears, open the Console window. Press the Play button above the Viewport.
You may expect a message to print in the Console, but no message will print. Gasp! What happened?
Press the Play button again to stop the game. Let’s explain what happened.
In order to work, a script needs to be attached to a game object in Unity. Right-click in the Hierarchy. Choose “Create Empty”. “GameObject” will appear in the Hierarchy, which means a new game object was successfully created.
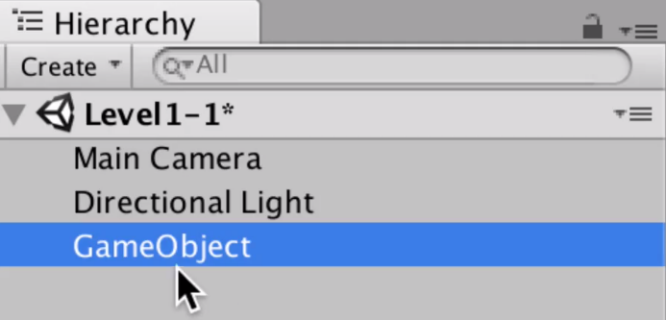
Naming Objects
In the Inspector, rename GameObject “GameController”. We don’t want to leave our game objects with the default name because that will lead to a lot of confusion later down the road, when we inevitably have many game objects.
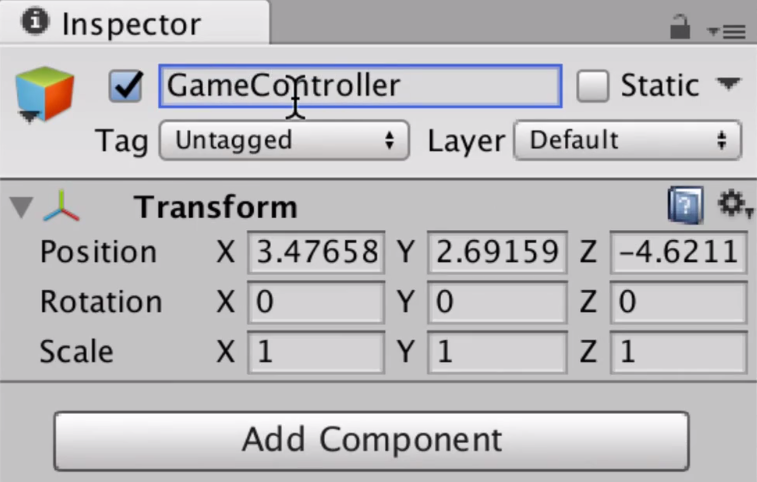
Set GameController’s Position to 0 0 0. This will set the position of the object to equal the origin of the game world.
Attaching a Script to an Object
To attach the GameController script to the GameController object, drag and drop GameController from the Scripts folder to the GameController object in the Hierarchy. Alternatively, you can drag and drop the GameController script to a blank space in the Inspector when the GameController object is selected.
Game Controller (Script) will appear as a component in the Inspector.
What is a Game Controller?
You can think of the GameController script as something that will control the rules of the game. It will keep track of the timer, check if our player died, and show messages in a text interface.
Since the script will control the game’s objects, drag and drop Main Camera and Directional Light into GameController in the Hierarchy. This will make GameController the parent object of two child object, Directional Light and Main Camera.
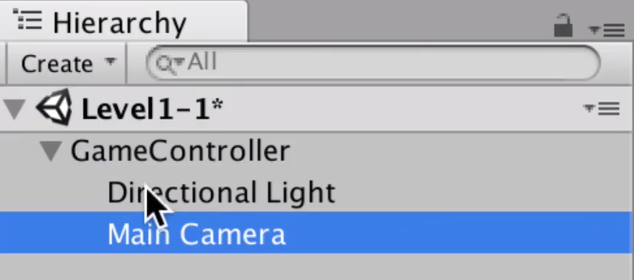
Let’s test the game again. Now that the GameController script is connected to an object, we will see the changes the script made to the game.
Press Play. Open the Console. The message “Hello world!” will print in the Console, as expected.

That means we know the script is working properly! Press Stop.
Congratulations! You successfully made your first script in Unity and wrote your first line of code in C#.
Review
Part 1: How to Organize Scripts in Unity
Part 2: How to Make a New Script in Unity
Part 3: How to Use MonoDevelop with Unity
Part 4: Understanding a C# Script
Part 5: Debugging and Testing
—Team Mammoth from Mammoth Interactive INC. Tutorial by Glauco Pires and Transcribing by Alexandra Kropova

