In every game, you’ll want to show your players instructions, their score, and whatever other text to get them through a level. To show these, you’ll need to set up what’s called a game interface. Learn all about this in @MammothCompany’s free tutorial!
Tweet
The best way to learn is through example. We’re going to use a super basic 3D Whackamole game prototype to show you how to make an interface.
In this tutorial:
- Step 1: Showing Time Left in Game
- Making a Game Timer
- Connecting a Variable and Game Object
- Step 2: Keeping Track of Score
- Connecting Objects to the Inspector
- Step 3: Showing Game Over
- Stopping Game Action
- Step 4: Restarting the Game
- Saving Lighting on Game Restart
To follow along, you’re going to need a Unity project open with a player and objects. If you need help setting up your Unity project, go to our post How to Build a Unity Virtual Reality Game.
We’re using Unity v5.4.3f1. If you’re using a different version of Unity and find an incompatibility, drop us a comment down below with your question.

Step 1: Showing Time Left in Game
Let’s get started by showing on the screen the amount of time a player has left to complete a level.
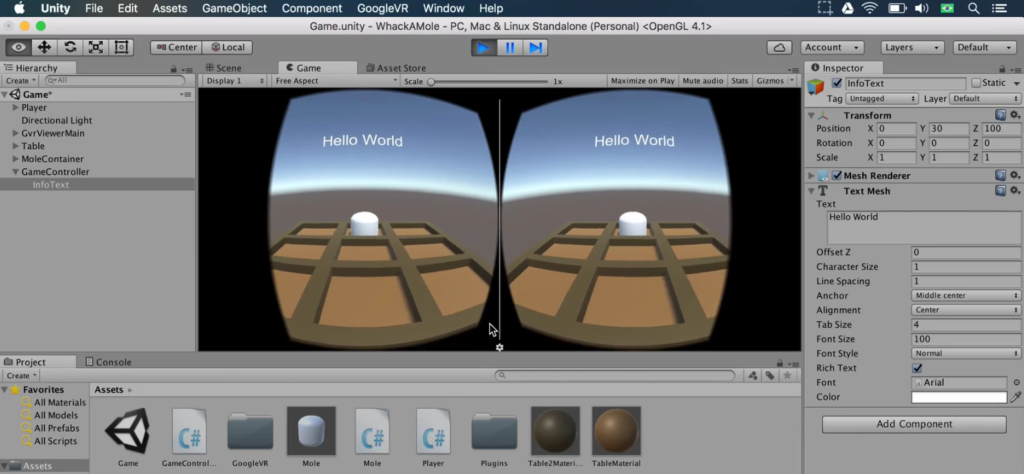
Begin by making a 3D Text object in the Hierarchy. Its default name will be “New Text.” Rename New Text to “InfoText”.
Move InfoText to the position 0 30 100. Change its Anchor to Middle center, Alignment to Center, and Font Size to 100.
Play the scene to test how this text object will look to the player. As you’ll see, the text “Hello World” will hover above the table.
Making a Game Timer
To make a game timer, open GameController.cs. If you need help setting up a script to control the game, check out our previous tutorial: Spawning Objects Randomly in Unity
Declare the following variable to represent the game timer. Set the game to last 15 seconds for now.
public GameObject moleContainer; public float spawnDuration = 1.5f; public float spawnDecrement = 0.1f; public float minimumSpawnTime = 0.5f; public float gameTimer = 15f;
In your Update method, add the following bold line of code to count down gameTimer.
// Update is called once per frame void Update () { spawnTimer -= Time.deltaTime; if (spawnTimer <= 0f) { moles[Random.Range(0, moles.Length)].Rise (); spawnDuration -= spawnDecrement; if (spawnDuration < minimumSpawnDuration) { spawnDuration = minimumSpawnDuration; } spawnTimer = spawnDuration; } gameTimer -= Time.deltaTimer; }
Add the following if block to run code when gameTimer is greater than 0. Later, we will add code to show certain text in InfoText when the game timer is above 0.
gameTimer -= Time.deltaTimer; if (gameTimer > 0f) {
}
Declare another variable to reference InfoText. Note that the variable is of type TextMesh, which means the value it holds will be a text mesh, just like InfoText.
public GameObject moleContainer; public TextMesh infoText; public float spawnDuration = 1.5f; public float spawnDecrement = 0.1f; public float minimumSpawnTime = 0.5f; public float gameTimer = 15f;
Connecting a Variable and Game Object
Although we have created the variable, we need to connect the variable to the actual InfoText game object.
To do so, save the script, and open Unity. Select GameController. Drag and drop InfoText to the Info Text field in Game Controller’s Script component. Now we have a reference to InfoText.
Open GameController.cs. In the Update method, use the following code to display the amount of time left in the game in InfoText when gameTimer is greater than 0.
Note that \n is code that will create a break in the text and start the text following it on a new line.
gameTimer -= Time.deltaTimer; if (gameTimer > 0f) { infoText.text = "Hit all the moles!\nTime: " + gameTimer; }
gameTimer is a float, which means it may display many decimal places of time left. That won’t make for a clean game interface because it would show too many digits. To clean this up, add the following bold code to display the time remaining in integers.
gameTimer -= Time.deltaTimer; (gameTimer > 0f) { infoText.text = "Hit all the moles!\nTime: " + Mathf.Floor (gameTimer); }
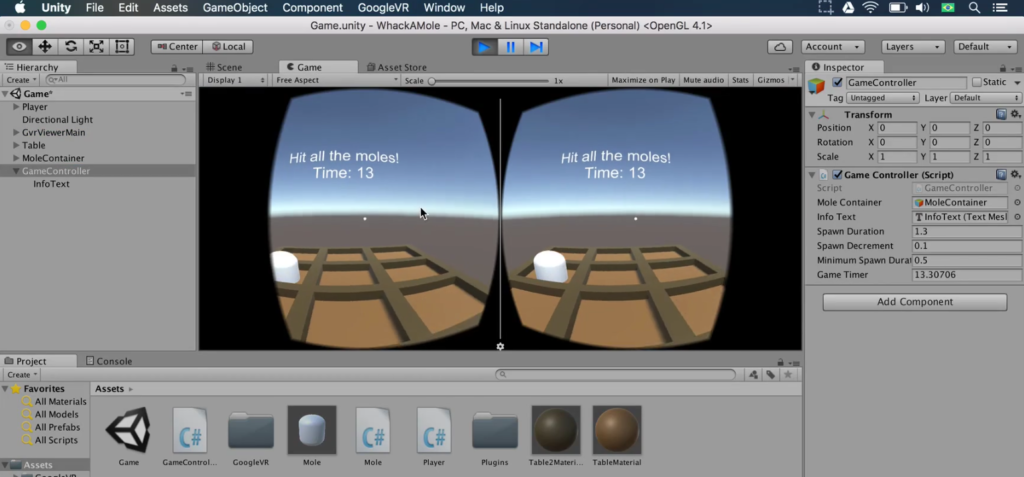
Let’s see how this code affected our game. Save the script, and open Unity. Press Play.
InfoText will contain the text “Hit all the moles!” InfoText will also count down the seconds remaining in the game.
Step 2: Keeping Track of Score
Next, let’s keep track of the player’s score and display it onscreen. Stop playing the scene, and open Player.cs.
Declare the following variable to represent the player’s score. The variable’s type is integer, its name is score, and its initial value is 0.
public class Player : MonoBehaviour { public int score = 0; … }
In the Player’s Update method, add the line score++ to increase the value of score by one every time the player hits a mole.
// Update is called once per frame void Update () { if (GvrViewer.Instance.Triggered || Input.GetKeyDown("space")) { RaycastHit hit; if (Physics.Raycast(transform.position, transform.forward, out hit)) { if (hit.transform.GetComponent () != null) { Mole mole = hit.transform.GetComponent (); mole.OnHit (); score++; } } } }
Next we need to reference the Player object in the Game Controller. Save the script, and open GameController.cs. Declare the following variable to reference Player.
public GameObject moleContainer; public Player player; public TextMesh infoText; public float spawnDuration = 1.5f; public float spawnDecrement = 0.1f; public float minimumSpawnTime = 0.5f; public float gameTimer = 15f;
When gameTimer is greater than 0, add the following code to display the player’s score in InfoText.
gameTimer -= Time.deltaTimer; if (gameTimer > 0f) { infoText.text = "Hit all the moles!\nTime: " + Mathf.Floor (gameTimer) + "\nScore: " + player.score; }
Connecting Objects to the Inspector
Save the script, and open Unity. Select GameController. Drag and drop Player to the Player field in GameController’s Script component. This is an important step that can be easy to forget: connecting the game object to the Inspector.
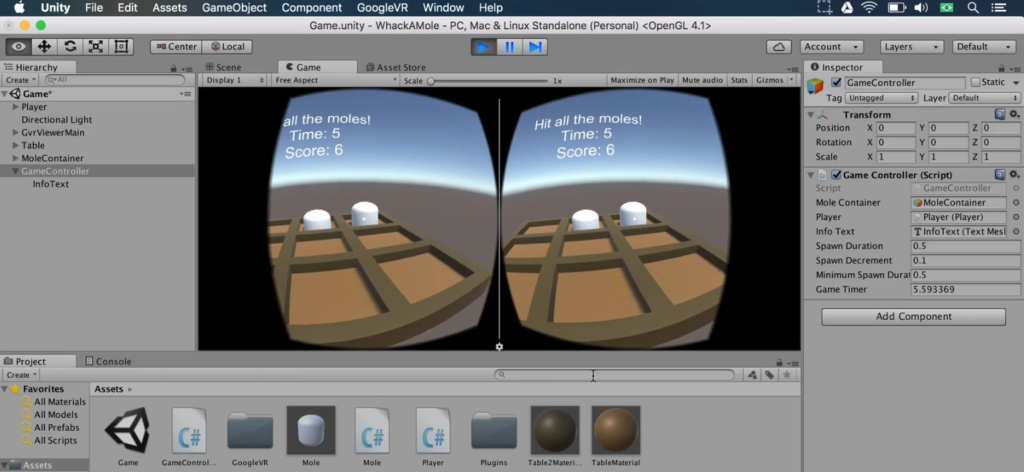
Let’s test our code! Press Play. InfoText will display “Hit all the moles!”, the time remaining, and the player’s score.
If you’ve been working on the same game as our previous tutorials, your score will increase every time you hit a mole.
When you’re done testing, stop playing the scene.
Step 3: Showing Game Over
When the timer reaches 0, we want to print the score and stop moles from appearing. Open GameController.cs. In the Update method, add the following else block to run code when gameTimer is less than or equal to 0.
gameTimer -= Time.deltaTimer; if (gameTimer > 0f) { infoText.text = "Hit all the moles!\nTime: " + Mathf.Floor (gameTimer) + "\nScore: " + player.score; } else {}
Add the following code to change the text of infoText. Let’s have InfoText display that the game is over, and display the player’s score:
gameTimer -= Time.deltaTimer; if (gameTimer > 0f) { infoText.text = "Hit all the moles!\nTime: " + Mathf.Floor (gameTimer) + "\nScore: " + player.score; } else { infoText.text = "Game over! Your score: " + Mathf.Floor(player.score); }
Stopping Game Action
We also want collectables to stop appearing on the screen when the game is over. To stop the moles from appearing, cut the code in the Update method that spawns the game. Paste the code into the if block as follows:
gameTimer -= Time.deltaTimer; if (gameTimer > 0f) { infoText.text = "Hit all the moles!\nTime: " + Mathf.Floor (gameTimer) + "\nScore: " + player.score;
spawnTimer -= Time.deltaTime;
if (spawnTimer <= 0f) {
moles[Random.Range(0, moles.Length)].Rise ();
spawnDuration -= spawnDecrement;
if (spawnDuration < minimumSpawnDuration) {
spawnDuration = minimumSpawnDuration;
}
spawnTimer = spawnDuration;
} } else { infoText.text = "Game over! Your score: " + Mathf.Floor(player.score); }
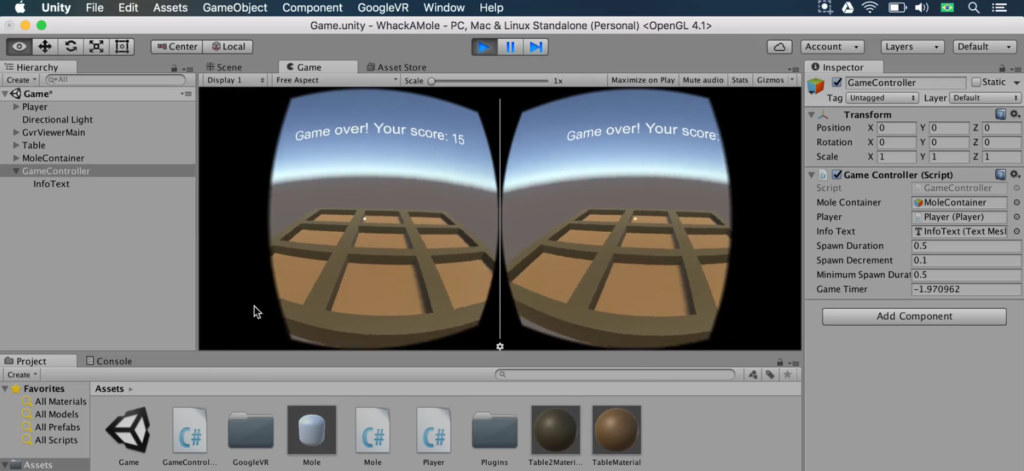
Save the script, and open Unity. Press Play. After 15 seconds, InfoText will display “Game over!” and your final score. The moles will stop appearing.
Stop playing the scene.
Step 4: Restarting the Game
Next we will create the logic to restart the game. Open GameController.cs, and add the following using statement. The script contains 2 default using statements so that we can access the UnityEngine and its Collections.
Our new using statement allows us to access the SceneManagement class of the Unity Engine. This is the class that will allow us to implement a game restart.
using UnityEngine; using UnityEngine.SceneManagement; using System.Collections
Declare the following variable. We will use this to restart the game after a wait time of three seconds.
Mole[] moles; private float spawnTimer = 0f; private float resetTimer = 3f;
When the game is over, use the following bold line to begin counting down the reset timer.
} else { infoText.text = "Game over! Your score: " + Mathf.Floor(player.score); resetTimer -= Time.deltaTime; }
Add an if block to run code when resetTimer reaches 0.
} else { infoText.text = "Game over! Your score: " + Mathf.Floor(player.score); resetTimer -= Time.deltaTime;
if (resetTimer <= 0f) { } }
If the condition is met, add the following code to restart the game in the current scene. This code uses the LoadScene function of the SceneManager class to load the current active scene.
} else { infoText.text = "Game over! Your score: " + Mathf.Floor(player.score); resetTimer -= Time.deltaTime;
if (resetTimer <= 0f) { SceneManager.LoadScene (SceneManager.GetActiveScene().name); }}
Saving Lighting on Game Restart
Save the script, and open Unity. To ensure that the scene’s lighting does not change, which is a bug that may occur, go to Window > Lighting. Unselect the Auto checkbox, and press Build. This saves the scene’s current lighting data.
Close the Lighting window. Play the scene. When the game ends, it will restart after three seconds.
We’ve finished making a simple game interface! We’ll continue this game in the next tutorial. Unless you oppose…. What tutorials do you want to see next? Drop a comment below.
Review
- Step 1: Showing Time Left in Game
- Making a Game Timer
- Connecting a Variable and Game Object
- Step 2: Keeping Track of Score
- Connecting Objects to the Inspector
- Step 3: Showing Game Over
- Stopping Game Action
- Step 4: Restarting the Game
- Saving Lighting on Game Restart
—Team Mammoth from Mammoth Interactive INC. Tutorial by Glauco Pires and Transcribing by Alexandra Kropova